 Trips to the gym, calorie counting, eating plenty of veggies…before the new year officially begins, I thought I’d give you a final hoorah, something to cap off the holidays with a bang. There has to be a good reason for making croissants, as they certainly aren’t your everyday kind of bread roll. I make these babies once in a blue moon, and celebrating the end of 2014 is a good enough reason for me. Making croissants requires time, patience, and a gentle touch. And, as any baker who has made croissants before knows, the frigid December air makes the process that much easier.

The first time I made croissants was in pastry school. I remember the day clearly as it was one of the main reasons I enrolled in classes. It’s a good thing I did too, because croissant making is really hard to learn from text, and even harder to explain. The process of creating a laminated dough can be thrilling for a baking enthusiast, but only if you feel like it’s something you can learn without getting overwhelmed.
 There’s one simple addition that makes a croissant go from pale butter yellow to earthy leaf green, and that’s a good quality matcha powder. The matcha gets incorporated into the flour-based part of the croissant dough or dètrempe, not the beurrage, or butter block.
 One full recipe of this dough makes 32 crispy, flakey mini matcha croissants. If you like variety, then divide the dough up to make both regular (16) and chocolate croissants (12), which are a bit larger than the plain kind. If you want to enjoy every croissant fresh out of the oven, you can easily freeze the croissants after shaping them. Simply freeze them after they are parked on the baking sheet. When they’ve hardened, place them in airtight bags in the freezer so that you can bake them up whenever you’re in need of a tea break.
 The matcha actually makes the croissants taste more savory, so these are ideal for creating tea sandwiches like smoked salmon or turkey tarragon. My favorite way to enjoy these matcha croissants is plain and simple, with a dab of some sour raspberry jam and a cup of light, frothy matcha on the side. Serve them for New Year’s brunch as a delicate and decadent way to finish off the holiday season.
 Matcha Croissants
Makes 32 plain or 16 plain & 12 chocolate.
Ingredients:
{Dough- Dètrempe}
1/2 cup water, warm for activating yeast
1 Tbsp active dry yeast
3 1/2 – 4 cups all-purpose flour
3 Tbsp matcha powder (I used Mizuba Matcha)
1/3 cup sugar
1 Tbsp salt
1 cup whole milk, at room temperature
bench flour
egg wash, one egg beaten with 1 tsp of water
{Butter- Beurrage}
12 oz butter, slightly colder than room temperature (stiff but not hard to the touch)
2 Tbsp all-purpose flour
{Extras}
semi-sweet chocolate chips
Equipment:
small bowl
stand mixer with large bowl and dough and paddle attachments
plastic wrap
large plastic zip bag
large work surface
rolling-pin
pastry brush
sharp knife
18″ ruler
2 large baking sheets, fitted with parchment paper
Directions:
1.) In a small bowl, combine yeast with warm water. Set this aside for a few moments to activate the yeast. In bowl of stand mixer fitted with dough attachment, add the proofed yeast mixture and 1 cup of milk. With the mixer on low, gradually add 3 1/2 cups of flour, matcha, sugar, and salt. Mix for 1-2 minutes until a soft dough is formed. If the dough looks too moist and is sticking to the bottom of the bowl, add 1 Tbsp of flour at a time until the dough doesn’t stick to the bottom of the bowl. You may need to add up to a total of 4 cups of flour. Set the mixer to high and mix the dough until it is smooth, elastic, and no longer sticky. This should take about 4 minutes. The dough should be the consistency of soft butter.
 2.) Cover the dough with plastic wrap completely, then place it into a large plastic zip bag and seal tightly. Leave at room temperature to sit for 30 minutes to allow for the gluten to relax.
 3.) To make the butter block, clean the now used/empty mixing bowl, then attach the paddle attachment to the stand mixer. Beat the butter and flour on high speed until you get a smooth consistency similar to the croissant dough you just made. Make sure there aren’t any lumps. If there are, smash them out with your fingers. Place this butter-flour mixture on a large piece of plastic wrap and cover completely.
 4.) With your hands, mold the plastic covered butter into a rectangle that is 5″ by 6″, and about 1″ thick. Try to slap out any air from the butter block. Place in the fridge to chill until needed.
 5.) On a lightly floured work surface, roll the croissant dough to a rectangle 10″ by 16″. Brush off any excess flour from the dough’s surface with the pastry brush. Place the chilled butter block into the center of the rectangle, with the short side of the butter facing the long side of the dough.

6.) Start to make brochure-like folds by first folding in the left side over the butter block. Again, brush off any excess flour with the pastry brush.
 7.) Now fold the right side of the dough over the center to create a brochure looking dough package. Again, brush off any excess flour.
 8.) Rotate the dough package 90 degrees to the right. Use the rolling-pin to lightly press the dough into a 10″ by 16″ rectangle again. Be gentle, patient, and kind to the dough. Press the rolling-pin down to make impressions rather than using a strong rolling motion. Try not to roll over the edges as that may cause the butter to leak out.
 9.) When you achieve an 10″ by 16″ rectangle again, fold the left and right sides in towards the center, to create a 3 layered brochure again. This is your first turn, hence you can place one finger impression in the dough (I placed in upper right). Now cover the dough with plastic wrap, then place this brochure-like rectangle into the fridge to chill for 30 minutes. Repeat this process 3 more times for a total of 4 turns, covering the dough with plastic wrap and refrigerating for 30 minutes in between each turn.
 10.) After 4 turns, make sure to chill the dough for 30 minutes again.

11.) Divide the dough into 4 pieces. Each piece gets rolled into a 7″ by 18″ rectangle. Work with one piece at a time, refrigerating the other pieces until you are ready for them.  12.) Roll one piece of the dough into a 7″ by 18″ rectangle, trimming off sides with a sharp knife to create clean edges. Mark the dough every 2 inches using a ruler and knife. Cut lines connecting the marks to create 8 full triangles (and two-half triangle scraps at each end).
 13.) For each triangle, score the center of the base about 3/4″ in to create an Eiffel Tower looking piece of dough.
 14.) Roll the base of the Eiffel Tower up towards the tip to create a finished croissant. Push the ends in to create a crescent shape. Make sure the tip is tucked under so that it doesn’t puff up during baking.
 15.) Place the finished croissants (8 to a pan) on a large, parchment lined baking sheet. Uncovered, let them proof for about 2 hours at room temperature. When ready, brush with egg wash, then bake in a pre-heated 350 degree F oven for 12-15 minutes or until puffed and golden brown. Repeat steps 12-15 to make another set of plain matcha croissants.
 16.) To make chocolate croissants, roll a piece of dough out (from step 11), again into a into a 7″ by 18″ rectangle, trimming off sides with a sharp knife to create clean edges. On the top and bottom of the long sides of the dough, mark the dough every 3 inches using a ruler and knife. Cut lines connecting the marks to create 6 long rectangles.
 17.) Place some chocolate chips at the bottom of one rectangular dough piece. Roll it up in a sushi roll like fashion, sealing the top edge with a brush of egg wash.
 18.) Place the chocolate croissants (6 to a pan) seam side down on a large, parchment lined baking sheet. Use the palm of your hand to slightly smash the roll down so that it lays like a pillow. Uncovered, let them proof for about 2 hours at room temperature. When ready, brush with egg wash then bake in a pre-heated 350 degree F oven for 12-15 minutes or until puffed and golden brown. Repeat steps 16-18 for another set of chocolate matcha croissants.

 A few days ago, outside my living room window, I noticed a bird tucking in and out of the crevice between the misaligned wooden fence panels surrounding our house. The bird seemed busy at work–occupied. Amidst its constant activity, it managed to shoot me an occasional glare, so as to say back off lady, or you’ll regret it! It wasn’t until I saw the same bird again two days later that I realized what it was up to. Just in time to mark the beginning of spring, my feathery friend was building a nest.
 I get it, birdie. There’s a lot of work that goes into nest-making. As I learned a few days ago making these Bird’s Nest Tea Bombs, making a sturdy nest is a labor of love…an art form, really. My tea nests are made from maple syrup marshmallows covered in tea leaves. Although they look like you’ve just spotted them in a thick woodland forest, they serve an entirely different purpose. They’re designed to be an all-in-one tea brew, sweetener, and treat.
 This project for Bird’s Nest Tea Bombs was inspired by 2 things: my sister and some very beautiful tea. On last week’s Tea of the Week post, I featured Bellocq Tea Atelier’s No. 22 National Parks Dept. This nature-inspired blend of Darjeeling and Assam has bright green cedar tips and twiggy kukicha (twig tea) thrown in. It’s so perfectly organic and rustic that I still can’t get over how delicious it is.
 As an Easter gift (and because she’s a cool gal with great taste), my sister Melissa sent me some dark chocolate blue robin candy eggs from a fantastically elegant candy shop in Beverly Hills called Sugarfina. These delightful candies and a tin of gorgeous tea married to make this whimsical confectionary DIY. Here, a small blob of marshmallow holds about 2 teaspoons of loose tea together, just the right amount for small teapot brew. Although you can use any marshmallow recipe to make these, I like to use a maple syrup base because it enhances the natural, mild sweetness of my steep. You can even make the marshmallows separately to snack on.
 More than anything, these tea marshmallows are ornamental, so don’t expect a lot of sweetness when they dissolve in your brew. Use any twig or flower based tea to make these Bird’s Nest Tea Bombs–a mix with colorful visual interest is ideal. Above all, just remember to enjoy the candy eggs before dropping the nests into the hot water. Happy springtime brewing my friends!
 Bird’s Nest Tea Bombs
 The first time I discovered tea flavored gummies I was at

 I have to admit that I find the shape of dragon fruits to be quite puzzling…attractive, yet rather odd. Dragon fruits actually come from cactus plants. In taste and texture, their flesh tastes a lot like bland kiwi. The color of a dragon fruit’s flesh is either white or hot pink, and is characteristically flecked with small, black seeds. If you’re lucky enough to find one, don’t be scared…try it! That being said, the less adventurous can easily swap out kiwi for dragon fruit in this recipe.


 This brings us to the inevitable discussion of high tea vs. afternoon tea. Which of these meals would you serve pasties at? Well, the honest answer is that if they are small and cute enough, you could get away with serving them for afternoon tea. But, strictly speaking, pasties are traditionally served for high tea, also known as meat tea.
 Because they are so delicious, pasties have managed to bridge the gap between high tea and afternoon tea. But make no mistake…anytime a food item is homely, humble, and about the size of your head, it’s a good sign that it might be better served at high tea. When it comes to afternoon tea, miniature (and elegant) is generally the name of the game.


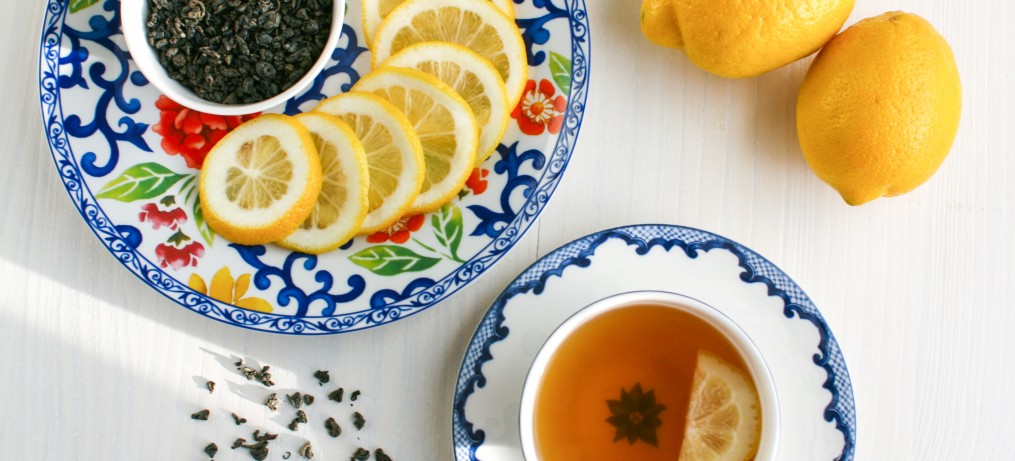
 Mark T. Wendell’s Irish Breakfast is an Assam blend, made up of small and large black leaves. What I appreciate most about the steep is that it’s strong without being overpowering. Just a few sips will leave you with a pep in your step and ready to make your own luck!


